 Home
Home

 Artists
 Search
 Recent
 Random
 Posts
Posts
 DMs
DMs
 Tags
Tags
 Random
 Importer
 Import
 FAQ
FAQ
 Account
 Register
 Favorites
 Login
Login

10 / 15 Paimon work process (Patreon)
Content

오늘의 캐릭터는 원신의 페이몬입니다. 메인 작업을 진행하면서 중간에 숨 돌리기로 할 캐릭터로 결정했습니다.
// Today's character is Paimon from the Genshin impact. I decided to take a breather in the middle of the main work.
게임에서 너무 귀엽게 나와요. 너무 귀여워서 만들지 않을 수가 없더군요.. 다음 시나리오가 빨리 나왔으면 좋겠네요
// Paimon looks so cute in the game. It was so cute that I couldn't help but make it. I can't wait to see the next scenario in game.
아무튼 이번엔 캐릭터의 파티션 작업에 대한 내용이 있습니다. 비슷한 작업을 하길 원하시는 분들이 있다면 도움이 되었으면 좋겠네요.
// Anyway, this time, there's something about the character's partitioning. If anyone wants to do something similar, I hope it helps.
일정 크기 이상의 캐릭터 작업을 할 때에는 캐릭터의 각 부위 파츠를 나눴을 때 굉장히 편리해집니다.
// When working on a character larger than a certain size, dividing the parts of each part of the character brings a lot of convenience in the work.
하지만, 무조건 전부 나누려고 하는 것 또한 좋은 방법이 아닙니다. 움직일 부분을 먼저 생각하고 움직이는 부분과 움직이지 않는 부분을 구분해서 나눠줘야 효율적입니다.
// However, trying to divide it all up is also not a good idea. It is efficient to think about the moving part first and divide the moving part and the non-moving part separately.
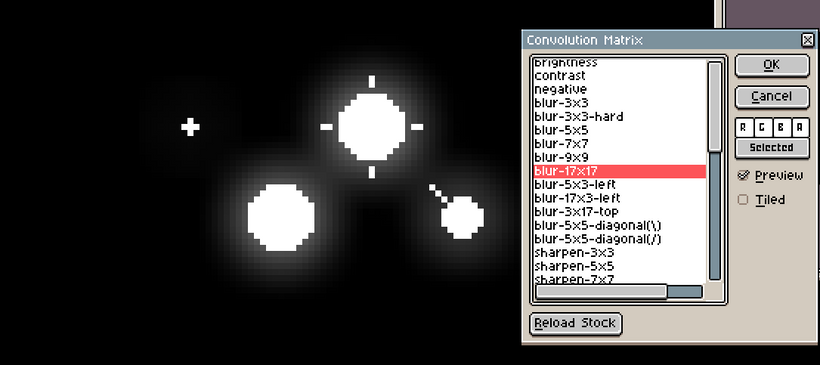
이번 작업에 있어서 캐릭터는 크게 5개의 파츠로 나눌 수 있습니다.
// In this work, the character can be largely divided into 5 parts.

몸통. 움직이지 않습니다. 즉, 장신구를 포함해 몸을 세부적으로 분리할 필요가 없습니다.
// Body. It won't move. In other words, there is no need to separate the body in detail, including accessories.
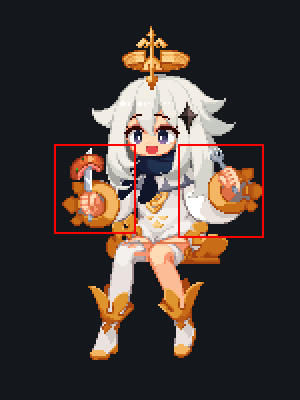
두 팔. 포크를 들고있는 왼팔만 움직일 것이니, 왼팔의 각 부위를 집중적으로 나눠줍니다.
// Both arms. The left arm holding the fork will move a lot. Distribute each part of the left arm intensively.


두 눈과 머리입니다. 눈, 얼굴, 머리카락, 머리장식의 총 4개로 분리해서 그룹으로 정리합니다.
// Two eyes and head. Split the eyes, face, hair, and headgear into four groups. the eyes will show the biggest movement.

그리고 두 다리를 따로따로 나눠줍니다. 다리를 흔드는 자세를 루프시킬 것입니다.
// Then, divide the two legs separately.

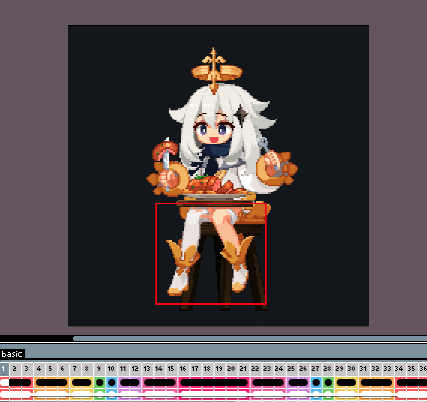
나눈 것을 모두 떼어보면 이런 느낌입니다.
// This is what it feels like if you take all the pieces apart.
이렇게 최종적으로 제일 움직임이 큰 왼팔, 다리, 머리, 그리고 움직임이 거의 없는 오른팔과 몸통의 총 5개의 그룹으로 나눕니다.
// Finally, the largest movement is divided into five groups: the left arm, the legs, the head, and the right arm and the body.
애니메이션 작업을 할 땐 먼저 가장 자주 반복되는 부위를 우선순위에 두고 만들어야 합니다.
// When you're working on an animation, you first need to prioritize the fastest repetitive parts.
이번 애니메이션은 다리를 지속해서 흔듭니다. 다른 동작을 취하면서도 계속해서 반복시킬 것이므로 제일 먼저 작업해서 프레임을 맞춰 뒀습니다.
// This animation shakes legs continuously. this motion is continue to loop while taking other actions, so I worked first and set the frame.

그리고 왼팔, 얼굴 순으로 작업해줍니다. 스카프를 제외한 몸통은 전혀 움직이지 않습니다.
// Then, work in order of left arm and face. Except for the scarf, the body doesn't move at all.

그리고, 작업된 모션을 전부 합쳐줍니다. 다리 애니메이션에 맞춰서 전체적인 프레임을 조정해주면 됩니다. 오른팔은 어색하지 않을 정도로 적당히 움직여 줍니다. 큰 움직임은 필요 없습니다.
// Then, combine all the motion that was worked on. You can adjust the whole frame according to the leg animation. Move your right arm properly so that it doesn't feel awkward. No major movement is required.
접시에 담긴 음식의 경우 모든 동작 작업이 끝난 뒤에 어색하지 않도록 동작에 따라 그려주는 방식으로 작업하면 굉장히 쉽습니다.
// In the case of food on a plate, it's very easy if you draw it according to the movement so that it doesn't feel awkward after all the work is done.

이후 망토를 그려넣고 Multiply와 Overlay, 그리고 심플한 VFX로 마무리 합니다. 망토에 들어가는 별자리 이펙트와, 바깥의 이펙트 표현 방식은 모두 동일합니다.
// Then, draw a cape and finish with Multiply, Overlay, and simple VFX.
The constellation effect in the cape and the external effect expression are all the same.
별자리 이펙트는 방법만 알면 쉽게 그려넣을 수 있습니다.
// For the constellation VFX, there is an easy way to draw.

1. 먼저 별을 그립니다. 심플한 애니메이션이므로 어렵지 않습니다.
// 1. Draw a star first. It is not difficult because it is a simple animation.

2. 모양에 맞춰 붙여 넣어 별자리의 모양을 만듭니다.
// 2. Copy and paste it according to the shape to form constellations.


3. 별자리의 모양에 맞춰서 별자리 라인을 그려줍니다.
// 3. Draw the constellation line according to the shape of the constellation.


4. 그리고 모두 합친 후 만들어진 것을 하나를 더 복사해서 블러 효과 (F9) 를 적용해 줍니다.
// 4. After you combine them all together, copy one more made and apply the Blur Effect (F9).
5. 완성! 가장 기초적인 방식이니, 응용해서 더 예쁘게 만들어 줍시다.
// 5. Finished! It's the most basic way, so let's apply it to make it prettier.

이렇게 해서 모두 완성이 되었습니다.
페이몬은 하나 더 그리고싶네요. 10월의 작은 두번째 작업이 될 것 같습니다.
// So it's all done.
I'd like to draw one more Paimon. It will be a small second work in October.
이곳은 환절기가 다가왔습니다. 건강에 모두 유의하셨으면 좋겠네요.
// The change of seasons has come here. I hope you all take care of your health.
다음 업데이트는 다음 주 주말이 되기 전이 될것 같네요.
// The next update will be before next weekend.
Files
