 Home
Home

 Artists
 Search
 Recent
 Random
 Posts
Posts
 DMs
DMs
 Tags
Tags
 Random
 Importer
 Import
 FAQ
FAQ
 Account
 Register
 Favorites
 Login
Login

Elven Forestmaker Work process (Patreon)
Content
※주의 ! gif 이미지가 포함되어 있으니, 패트리온 어플을 제외한 환경에서 읽어주세요! 패트리온 어플은 이미지를 강제로 리사이징 하기 때문에 gif를 재생할 수가 없습니다!
// ※Caution! gif The image is included, so please read it in an environment other than the Patrion app! The Gif cannot be played because the Patrion application forces the image to be resized!
안녕하세요! 이번엔 엘븐 포레스트 메이커입니다.
그럼 러프부터 시작하겠습니다.
// Hello! Today i made Elven forestmaker's wallpaper.
Let's start with rough.

러프 스케치. 늘 그렇듯, 전체적인 구도를 알수 있게끔만 해주면 됩니다. 복잡한 러프는 필요 없습니다.
// Rough sketch. As usual, you just need to know the overall composition. No complicated roughs required.

그리고 캐릭터를 애니메이션까지 바로 진행합니다.
이번엔 정적인 움직임이므로 (뭐 어느때라고 특별히 많이 움직이지는 않지만) 여느때보다 캐릭터의 헤어에 집중 할 것입니다.
// And i going to animate the character right away.
It's a static movement this time, so I'm going to focus more on the character's hair than ever before.

헤어 파츠를 모두 조립했을때는 매우 복잡해보이지만, 사실 3~4개의 종류를 미리 작업해서 붙여 넣은 것입니다. 이런 류의 작업방식은 프레임을 많이 사용해야 할때 활용하면 편리하게 작용할 수 있습니다.
// It looks very complicated when you assemble all the hair parts, but in fact, three to four types of hair parts were pre-worked and pasted together. This type of work can work conveniently when you need to use a lot of frames.


헤어의 각 파츠입니다. 중복된 파츠가 보이지요?
// Each part of the hair. Can you see the overlapping parts?

캐릭터 애니메이션을 끝냈으니, 배경 오브젝트를 조립 할 시간입니다.
배경의 각 파츠에 주의 해 주세요.
// Now that you've finished animating your character, it's time to assemble the background object.
Please pay attention to each part of the background.
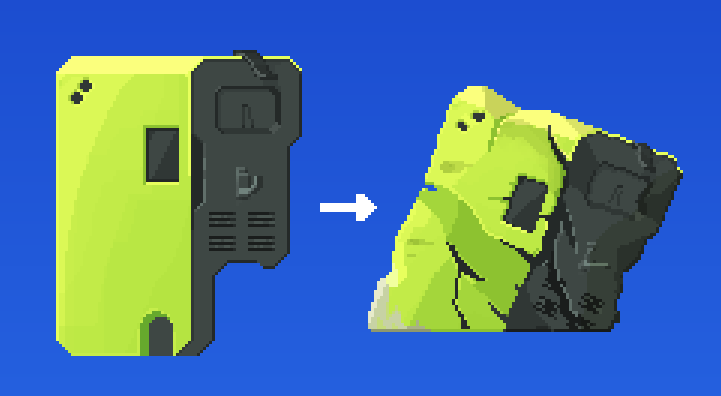
만약, 망가진 물건을 그리기 힘들다면 먼저 멀쩡한 물건을 그린 후 마구 찌그러트려 주면 됩니다. 회전하고, 이격시키고, 명암을 추가하고, 금을 내서 부숴보세요.
// If it's hard to draw a broken item, you can first draw a normal one and then crush it. Rotate, separate, add light and shade, and crack it.

다음은 나뭇잎입니다. 나뭇잎은 몇가지 나뭇잎 바리에이션을 만들고, 합쳐서 조립합니다. 명암으로 구분해 넣어주면 예쁘게 넣을 수 있습니다.
// Next is the leaf. Leaves are made of several kinds and assembled together. You can put it in pretty if you separate it into light and shade.

그리고 떨어지는 이파리들을 넣어주면 이렇게 배경의 기초가 완성됩니다.
// And if you put in the falling leaves, the base of the background is completed.

풀과 꽃들 또한 나뭇잎과 같습니다. 바리에이션 작업을 통해 넣어줍시다.
// Grass and flowers are like leaves, too.

마지막은 포스트-프로세스 단계입니다. 광원을 넣고 완성합니다.
// The following are the post-process steps.
빛줄기들은 이전 홀로그램 제작 튜토리얼을 응용해서 더 예쁘게 넣을 수 있습니다.
// Light streams can be prettier by applying the previous hologram tutorial.


레이어를 착실히 구분해뒀으면, 이런 식의 바리에이션을 만들 수 있습니다.
// If you have carefully distinguished the layers, you can create this kind of variations.

(찢어진 옷, 스타킹, 다크엘프 등의 바리에이션들. 모두 9월 구독 보상으로 제공됩니다. 기대해주세요!)
// (variations of torn clothes, stockings, dark elves, etc.) All available as a september subscription reward. Please look forward to it!)
어떠셨나요? 이번엔 무엇보다 프리셋 작업이 주가 되었습니다.
// How did you like it? This time, the presets were the main focus.
미리 이런 잎사귀, 풀, 기타 등등 프리셋 작업을 해두면 나중에도 유용하게 사용할 수 있습니다.
// Pre-setting these leaves, grasses, and other things can be useful later on.
보통 이런걸 "꼼수" 라고 많이 표현하지만, 저는 그렇게 생각하지 않습니다. 더 빠르고, 어쩌면 더 예쁘게 일관적으로 그릴 수 있으니까요. 모두 활용하기 나름입니다.
// Many people usually call it "trick," but I don't think so. It's faster, maybe more pretty, and consistent. It depends on how you use it.
다음은 커미션 작업입니다. 더 빠르게 할수도, 혹은 느리게 끝날수도 있습니다. 확실한건 다음 주말에 업데이트라는 것 정도네요. 긴 글 읽어주셔서 감사합니다!
// Next is commission work. You can do it faster, or you can end it slower. What's certain is that next weekend's update. Thank you for reading the long article!
Files
