 Home
Home

 Artists
 Search
 Recent
 Random
 Posts
Posts
 DMs
DMs
 Tags
Tags
 Random
 Importer
 Import
 FAQ
FAQ
 Account
 Register
 Favorites
 Login
Login

Holo tutorial (feat. andvari) (Patreon)
Content
※주의 ! gif 이미지가 포함되어 있으니, 패트리온 어플을 제외한 환경에서 읽어주세요! 패트리온 어플은 이미지를 강제로 리사이징 하기 때문에 gif를 재생할 수가 없습니다!
// ※Caution! gif The image is included, so please read it in an environment other than the Patrion app! The Gif cannot be played because the Patrion application forces the image to be resized!
안녕하세요. 오늘은 간단한 튜토리얼을 준비해봤습니다. 재미있게 봐주셨으면 좋겠네요
// Hello, I prepared a simple tutorial today. I hope you enjoy it.

오늘의 주인공인 안드바리입니다. 튜토리얼을 도와줄겁니다. 그럼 시작해봅시다.
// This is Andbari who will help with today's tutorial. Let's get started.

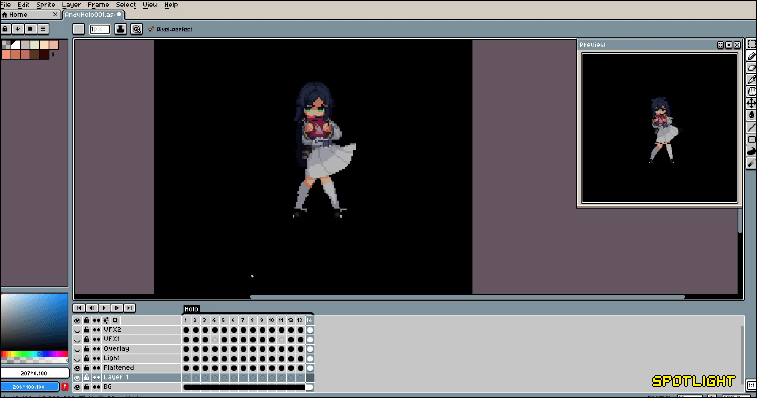
1. noise effect
먼저, 홀로그램의 3대 요소는 스포트라이트(빛), 노이즈, 블링크 이펙트(깜빡임) 입니다.
이 세가지를 응용하시거나, 추가하시면 다양한 바리에이션으로 만드는 것이 가능합니다.
// First, the three main elements of a hologram are spotlight (light), noise, and blinking effect.
If you apply these three things or add them, you can make them into a variety of variations.
노이즈를 만들때는, 완급을 조절하는 것이 중요합니다.
// When making noise, Please don't overdo it.

2. blink effect
블링크 이펙트를 적용할땐 레이어의 각 셀의 명도를 각각 조절하지 말고, 시프트 + 각각 셀을 선택해서 한번에 조정해줍시다.
// When applying the Blink Effect, do not adjust the brightness of each cell of the layer, but select Shift + each cell and adjust it at once.
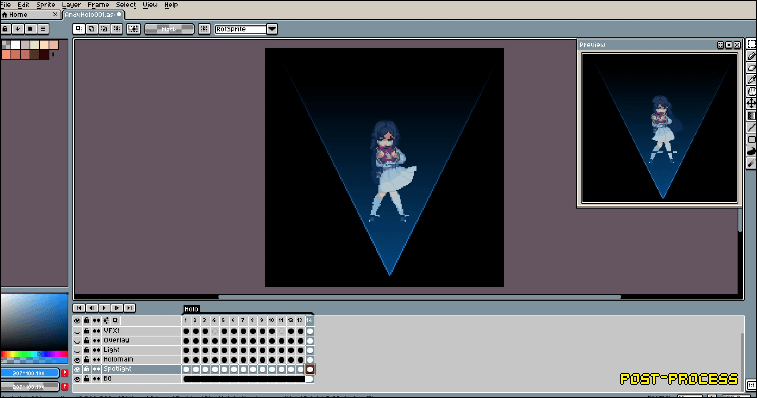
3. spotlight
조금 복잡합니다. 먼저, 원하는 스포트라이트 모양을 그려줍시다. (삼각형이나 사각형이 무난합니다.)
이후 컨트롤 + 셀 선택 기능을 이용하여 해당 모양만큼의 범위를 선택해줍니다.
그리고 새 레이어를 생성 한 후, 투명 컬러 + 스포트라이트 컬러의 조합으로 그라데이션을 넣어줍니다.
보통 여기까지 해도 좋지만, select - inverse (ctrl + shift+ i)를 하여 스포트라이트의 바깥 범위에 더 진하고 밝은 색으로 그라데이션을 입히고 다시 inverse를 한 후
select - modify - expand로 선택하여 자른 뒤 새 레이어로 붙여넣어 부드러운 테두리를 만들어줍니다.
이후 과정은 blink effect와 같습니다.
// It's a little complicated. First, let's draw the spotlight shape you want. (Triangle or square is easy.)
Use the subsequent controls + cell selection function to select a range for that shape.
After creating a new layer, add gradation in a combination of transparent + spotlight colors.
Usually it's okay to stop here, but select - inverse (ctrl + shift+ i) to apply gradation to the outer range of the spotlight in brighter colors, and then inverse again.
Select - modify - extend to cut and paste into a new layer to create a soft border.
The following process is like blink effect.
4. noise ( afterimage effect )
만들어진 홀로그램 레이어를 ctrl + 드래그 앤 드롭하여 복사 한 뒤, 레이어의 속성을 color dodge로 변경하고 몇 칸 취향껏 이동시켜 줍니다. 이후 투명도를 적절하게 조정하면 완성.
// Copies the created hologram layer by ctrl + drag and drop, then changes the properties of the layer to color Dodge and moves it to your liking. After that, adjust the transparency properly to complete.

이후 spotlight의 색상을 취향껏 조정해주면 됩니다.
// After that, you can adjust the color of the spotlight to your liking.

이렇게 완성.
// Finish

구성 요소 별 비주얼 변화입니다.
// visual change to each component.
어떠셨나요? Connector Yumi 업로드에 앞서서, 해당 작업물에 들어간 내용을 축약해서 튜토리얼로 만들어 봤습니다.
// How was it? Before uploading Connector Yumi, I made a tutorial out of what was included in the work.
이 내용을 응용하여 더 나은 퀄리티로, 새로운 비주얼로도 만들 수 있습니다.
다른 튜토리얼도 기회가 되면 올려볼 예정입니다 배워 가시는 분들께 도움이 되었으면 좋겠네요.
// This content may be modified and used in other ways.
I'm going to upload other tutorials if I have the chance. I hope it will be helpful for those who are learning.
긴 글 읽어주셔서 감사합니다.
// Thank you for reading!
Files
