 Home
Home

 Artists
 Search
 Recent
 Random
 Posts
Posts
 DMs
DMs
 Tags
Tags
 Random
 Importer
 Import
 FAQ
FAQ
 Account
 Register
 Favorites
 Login
Login

How Light Bounces in a Gem (Patreon)
Content
I wanted to explain somewhat more scientifically how to paint a realistic gem, so I created this to clarify how light bounces and reflects to make something beautiful!
I haven't done a tutorial like this before so please let me know if I got anything wrong. xD This is done using a pretty generic light setup, but the principles apply to any setting.
Commence!

The first step is the most important to understand.
First, the light hits the surface of the gem. Some of it reflects off of the surface, creating that bright primary highlight (A) that shines into your eye. Highlight A is the brightest because is it the section of the gem's surface that is most directly facing the light source.
Highlight A clearly explains to the viewer how rough or smooth the surface is. If the highlights on the surface of the gem are very sharp, then it's very smooth and buffed. If the highlights are softer, it suggests the surface is a little rougher- like sea glass.
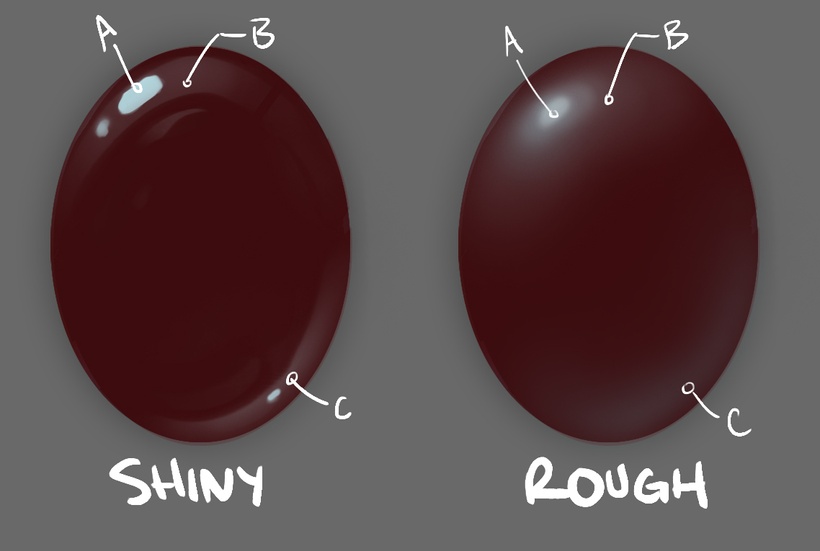
You can see the large subtle Highlight B surrounding Highlight A, which is reflecting the environment. If the gem is very smooth, you will be able to see reflected details from the environment- think of the surface acting like a mirror.
Highlight C is present due to the ambient light in the room, or due to a secondary light source. It is usually very subtle, but it helps to clarify the form of the object.
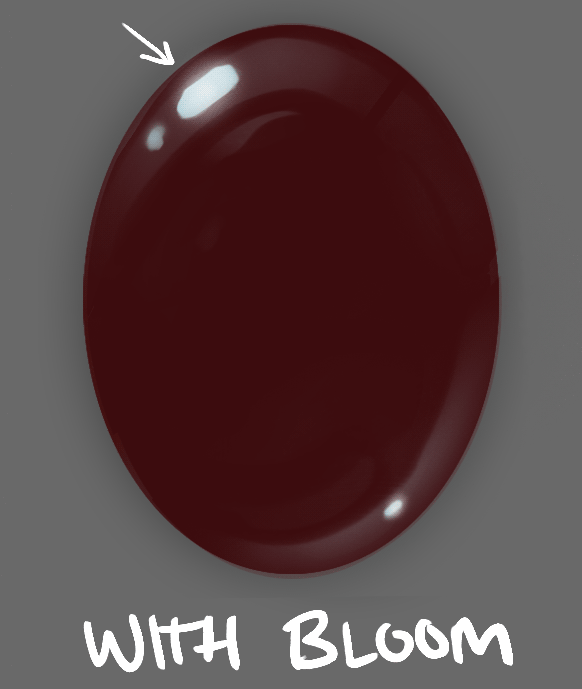
When a bright direct light hits a smooth surface, it can create bloom. Bloom is a soft light surrounding that very bright highlight. Think about when you look directly at a lamp in a dark room, and you can see a glow around it. This is created by the light that bounces off of molecules very close to the light source. It can easily be added with a soft brush.

When the light hits the surface, some of it enters the gem and bounces around within its form. This subsurface scattering creates the beautiful inner glow that makes gems very eye-catching.
I build up this glow with a very soft brush and I like to vary the hue a little bit. Paint this in gently and slowly rather than trying to paint it in a single brushstroke in order to create some subtlety. Make sure to paint this UNDER the layers with the surface highlights.
Now, the magic starts to happen.
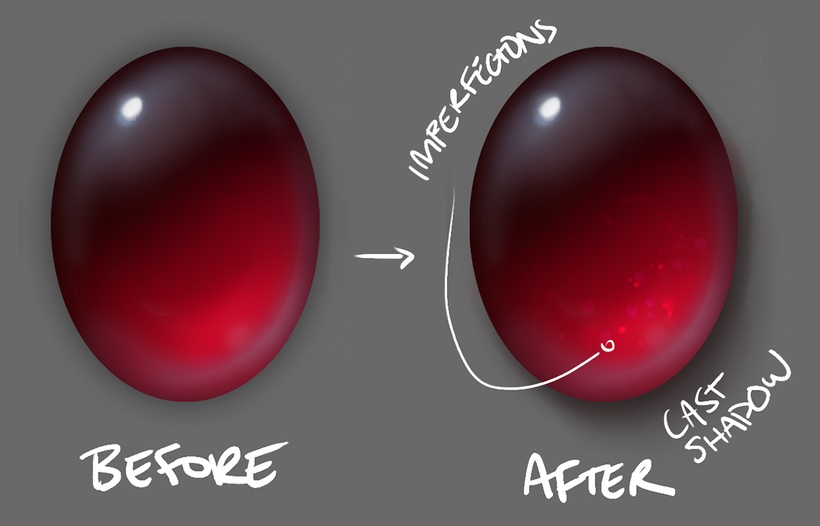
Adding some bubbles, scratches, and imperfections to the gem will breathe a lot of life into it. These are bright, saturated details that pop forward when the bounce light inside the gem strike them. I like to use the Color Dodge layer for this to make sure they're vivid.
The light blocked by the gem creates the cast shadow on the opposite side of the form from the light source. Since the light is coming from the upper left, the cast shadow will be on the lower right.
The cast shadow is darkest and has harder edges when very close to the gem. As it stretches away, it becomes lighter and softer.

The final step of the light's journey is a subtle but beautiful detail. Some of the bounce light that is hopping around within the gem will eventually escape, which creates a beautiful, saturated glow within the cast shadow. (2)
The light that creates Highlight A also bounces off and reflects onto the surface below, which is seen on the top left. (1)

And there you have it! There are more specific ways to describe this process, but I hope it clarifies the basics of bounce light and reflections in gems. Thanks for reading! Let me know if you have any feedback. :)
Files
