Home
Home

 Artists
 Search
 Recent
 Random
 Posts
Posts
 DMs
DMs
 Tags
Tags
 Random
 Importer
 Import
 FAQ
FAQ
 Account
 Register
 Favorites
 Login
Login

WIP#24: Pretty Colours (Patreon)
Content
A pretty large, but often under-appreciated part of the process when finishing renders is colour management! For a lot of CG artists, this is the "secret sauce" they're missing out on - frustrated that their renderer is spitting out dull, flat or unrealistic feeling images and wondering why. The secret it you have to know about colour spaces, or you'll always be leaving stuff on the table!
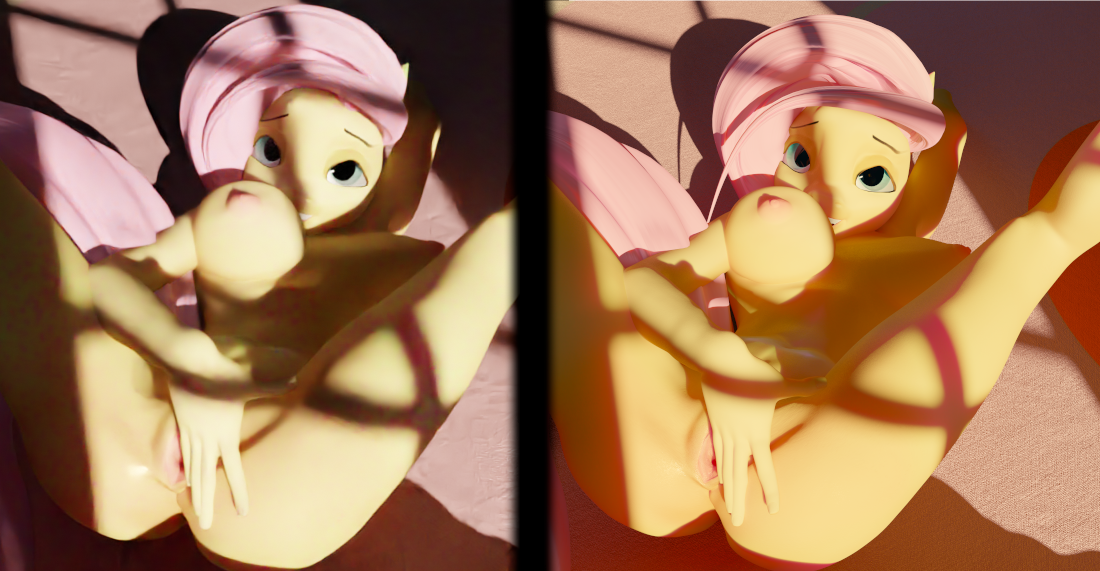
In the fluttershy example above, you can see the rather stark contrast between the image in blender's default colour transform (left) and my custom colour grading (right)
There are a million different approaches it, but I prefer to render in "log" colour space, since it's very compatable with Davinci Resolve, my weapon of choice for editing, sound, comp and of course, colour! Here's what a log render looks like:

Terrible, right? That's because it's meant to be an intermediate step. What's happening here is instead of capturing the colour on a normal, "linear" scale and constructing an sRGB image from that (generally speaking, how Rec709 works), log plots the colour of each pixel on a logarithmic scale, hence the name. This looks like it crushes the contrast way down, because it does - but it does so in a very mathematically exact way so that more extreme luminance values are as perfectly preserved in the image as bit depth will allow - which in this diagram is means "never going off the top of the scale"

For more details on log colour space check out this rocketstock article, it goes into quite a lot more detail.
So we need to convert our image back to a prettier colour space! that's quite easy, we just apply a log to Rec.709 "LUT" or Look Up Table. What these do is map every pixel in the image from one arbitrary colour space to another - if you're familiar with math, they're essentially very large 3-dimensional vector fields that the image is transformed along. LUTs are very hard to make, and very easy to use.
Why bother with this complex process if it just ends up back where we started? Well, it doesn't. Kind of. At every stage of the process we can inject our own tweaks and adjustments, giving us far more control over the final look - for one thing, if we change the brightness of the log image, after the conversion to Rec.709 that same adjustment turns into changing the exposure of the resulting image. Very useful, since we're now dealing with a finite dynamic range!

That means when the image is being tweaked, at any time I can go back and adjust which parts are blown out or crushed down, so I never actually lose any detail permanently! Especially useful when using filmic luts designed to mimic the colour reproduction of real physical film stock - they often massively crank up the contrast and crush all the extreme values mercilessly. Here's how the colour setup looks in davinci resolve:

On the right you can see the four nodes I generally use. From left to right they are: an initial adjustment node for exposure, a LUT to convert from log to Rec.709, another node to apply a filmic LUT (here it is Kodak D383 D60), and then a final adjustment node to tweak things like the saturation and overall colour profile of the image - usually using a gamma tint to make the characters look closer to their canonical skin colour, and separate them from the background as much as possible.
What's great about this node based approach is that the same correction can be applied to multiple clips, as an adjustment layer! this means it can even be moved between projects. I have a general-purpose grade adjustment layer in a master bin so I can quickly drag it into a new project instead of setting it up from scratch every time.

Phew, that was a lot, huh? I'd still count myself as a novice at all this, frankly! I've learned a lot over the last two years, but even looking back at some of my more recent work, I can see a lot of room for improvement. I hope this look at what I've been able to learn, and how I apply it to my work has been helpful, or at least interesting!
Files