 Home
Home

 Artists
 Search
 Recent
 Random
 Posts
Posts
 DMs
DMs
 Tags
Tags
 Random
 Importer
 Import
 FAQ
FAQ
 Account
 Register
 Favorites
 Login
Login

Illustration #97 (Patreon)
Content
WIP images Short time lapse Long time lapse PSD file
Hey! I meant to have this posted last night, but I literally fell asleep sitting here, lol, sorry about that. Anyway, I hope you've all had a good last month, and I hope you like this new painting. A modern real world type of setting this time, which I don't do very often. I like doing them occasionally as a bit of variety, but I'm looking forward to getting back to fantasy themes. :)
This one's had kind of a weird process. You might recall I posted this preview earlier, showing a WIP of the lighting layer:
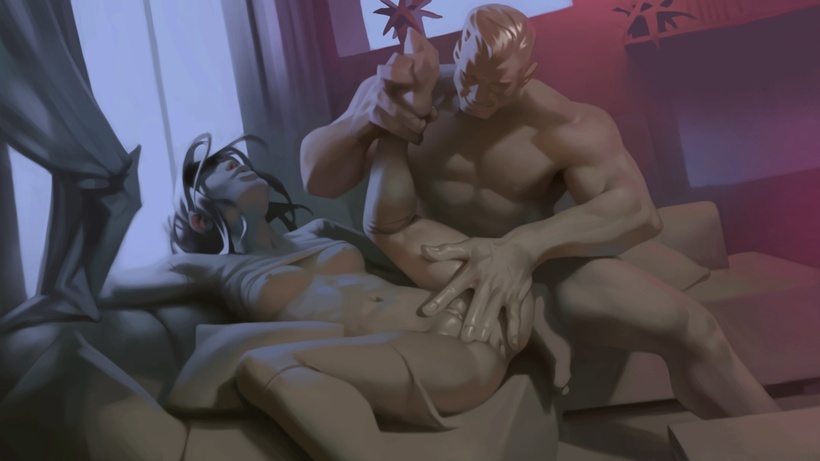
Normally I'd paint values first, and then add colors by painting them on a Hard Light layer on top of the greyscale values. But this time I painted colored lighting, like you see in the picture, onto a Hard Light layer, with local colors on a Normal mode layer below. You can see how that works if you download the PSD file, or in the time lapse video. It felt like such a good way to do things in the first half of the process, and it makes me sort of reframe how I think about lighting, which is great. I'd definitely recommend trying it out a little bit to see how it feels. However, keeping light and local colors separated like that did end up becoming frustrating for me later in the process, where I had a hard time painting details comfortably and achieve a satisfying polish, especially along hard edges. So, if I keep doing this in the future, I'm likely to only do it early in the process and then pivot and essentially flatten the image and keep painting on top on a regular Normal mode layer.
Having things go great early in the process and then kind of hitting a wall is a bit demotivating, lol. It happens more often than I'd like. But it's a good sign that I'm learning new things about what works and what doesn't.
In the time lapse video you'll also see me correct some perspective errors part way through the process by setting up a perspective grid using Blender. I know that might be a little bit intimidating for some of you, and it isn't completely necessary, but if you're interested in doing the same I've attached my equirectangular grid that you can use. You can see the exact process for setting it up in the video, but the general idea is to apply the grid as a background environment texture, and then set the painting as a camera overlay image in the camera settings. Then I rotate the camera and adjust the camera settings to what I feel most closely matches the painting. Here's the grid I ended up with:
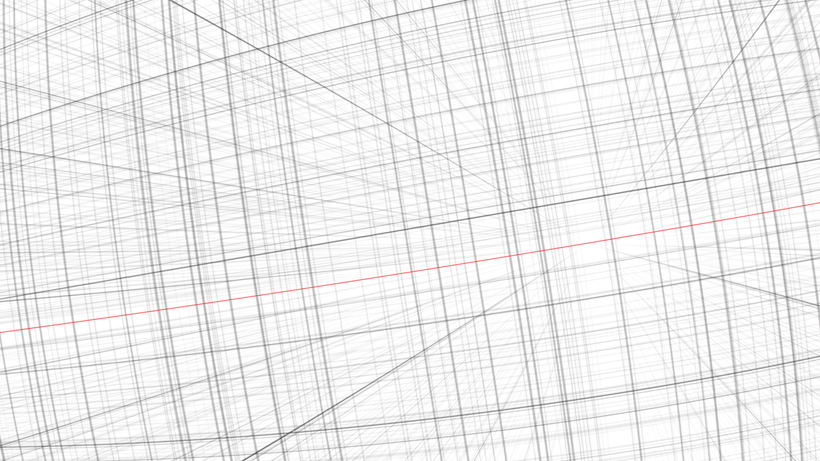
It might seem tedious to set up a grid in a 3D software like that (it's eaiser than it sounds), but the reason I do it is because I'm not really a fan of regular 1, 2 or 3 point perspectives. Their straight lines feel to me like a simplified representation of what things are really like, and make things just look wrong in some cases. To give a simple example, if you look straight at a very long wall in real life, the lines of the wall will point towards vanishing points on both sides of your peripheral vision, right? That's not possible with linear perspective lines, so they'll have to curve, like in the picture above. And the easiest way I've found to set up dynamically adjustable curved perspective lines is in Blender. There is a chance I might be stupid and overcomplicate things, lol, but for now this is what makes most sense to me. Hopefully some of you also find it helpful or interesting. 👍
Anyway, looking forward now to starting a new painting. :)
Files


