Home
Home

 Artists
 Search
 Recent
 Random
 Posts
Posts
 DMs
DMs
 Tags
Tags
 Random
 Importer
 Import
 FAQ
FAQ
 Account
 Register
 Favorites
 Login
Login

Linear Perspective and Apparent Magnitude (Pixiv Fanbox)
Content
Problem
A common problem in linear perspective is determining just how big some object should appear on the canvas (apparent magnitude). Intuitively, the relationship is between "how big something should appear" and "how far away it is". How do we take advantage of this relationship, and how do we make sure that it is accurate and useful for art?
Solution
First we start with a real world experiment to strengthen our intuition. Then follows a geometric proof and a simple equation that represents the relationship. After that follows pragmatic examples drawn by hand, a comparison with 3D software, and strategies for how to approach perspective problems.
Real World Experiment
Hold your arm stretched out in front of you, and have your palm facing outward, then take your other hand and put it halfway down your extended arm, palm also facing outward. How large do your hands appear to be relative to each other, as if you had taken a picture with your eyes? The far hand should look almost half as tall as the close hand. At twice the distance from your eyes, an object of similar size has an apparent magnitude of one half. If you move your close hand to 1/3rd the distance down your extended arm, the apparent magnitude difference would also seem to be 1/3rd.
Geometric Proof
The following is a 2D cross section of the view from our eye, the camera origin. The cross section is like a linear projection frustum, like what is used in 3D applications. The light red line represents an object with a height of `h`, that is a distance `d` away from our origin.
The light red object is copied another distance `d` away from the origin, for a total distance of `2d`:
The apparent magnitude of the further object, in relation to the closer object, is found by casting a ray from the top of the further object back toward the origin, and measuring where on the closer object the ray intersects:
We can now see that for each distance `d`, the apparent magnitude for an object is `h/d`, which you can then simplify to `1/d` for all `h` = `C` (some arbitrary constant). This relationship holds because of the Law of Similar Triangles. Similarly, if we know some object is `n*d` away, another object `m*d` away will have a apparent magnitude relative to the original object of `(n/m)*h`.
Pragmatic Examples
Say we want to draw figures with a hand stretched out, like we had done in the real world experiment. Let's first set up a vanishing point and declare some known values (the vanishing point represents the direction in which our figures are receding into space). First we will declare line that is 1 unit tall, and 1 unit away from our view. The same line 2 units away should be 1/2 the apparent magnitude, so copy half of the left line, and move it until it fits between the vanishing point line edges.
You may have also noticed a peculiar relationship between the projected lines and resulting triangles:
Now let's declare some proportions for our figure. Our head will be 1 unit tall, our arm will be 2 units long (from shoulder to wrist), and our hand will be 3/4ths units tall (the head is commonly used as a base unit of measurment in figure art). In order to measure out 2 units in space from our declared 1 unit distance, we need to divide our perspective guide up into more equally spaced intervals.
Let's go ahead and add a few more:
Now let's sketch the figure's head and hand. The hand will be 2 units from the head (at unit 3), and will be 3/4ths of the 1/3rd line:
Now let's connect the two with the arm. The elbow will be about halfway down the arm, and we have already set up the halfway marker at unit 2:
You may be thinking that this figure looks heavily distorted, and the reason for that is the relationship to Field of View (FOV). Since we declared our head to be very close to our camera, the changes in apparent magnitude are very large when covering the same spatial distances. Let's draw another figure with the same pose at unit 3, further away in space, and then return to the notion of FOV:
This one is a little bit harder to see, so let's resize the figure until it's the same head size as the original:
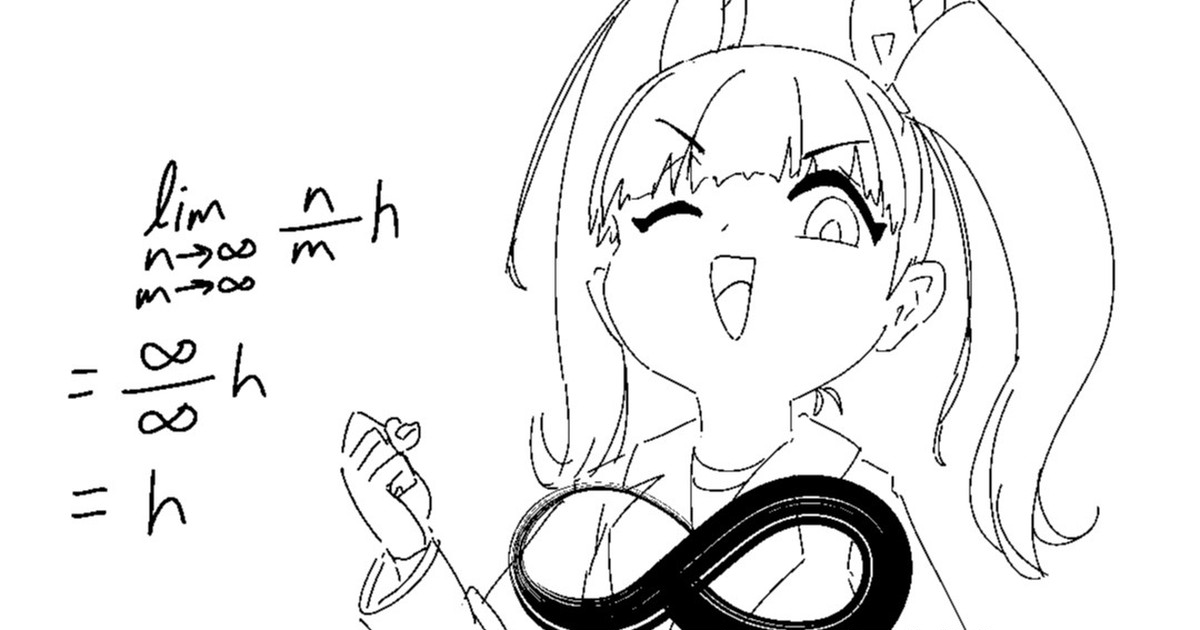
We can see now that the figure starts to flatten out, as the differences in apparent magnitude at further distances starts to reduce. That is, as `n` and `m` approach infinity, the relative apparent magnitude approaches 1. Sufficiently far away objects appear very close in apparent magnitude, regardless of how separated they are in space. This also relates to FOV, as scaling the figure up is the same as zooming in on the canvas, which is also the exact same as zooming in with your camera (but it's position remains the same), or making the FOV angle more narrow. The more we zoom in, the better we can observe distant objects, the more flat they appear to become.
Comparison with 3D Software
Now let's check against 3D software, which utilizes the same principles for linear perspective. Here we are using a model from Design Doll imported into Blender, and then adjusting the camera to match as closely as possible to the hand drawn perspective guide. The proportions and positions of the model differ somewhat from the drawing. The hand for the model is about 1/2 the height of the head, instead of 3/4s for our drawn figure and the head is a bit wider. The depth of the head was not accounted for while drawing, so the distortion appears much larger in the 3D view. Note, however, the height and position of the head, hand, and elbow, which are pretty close to what we had drawn:
For the figure that is further away:
If we desired more accuracy in our drawing, we could have also made a guide for the coronal plane as well.
Strategies for Resolving Perspective Problems
1. Wing it. This may be good enough after building intuition, that is, you can estimate where vanishing points are and what distances are without explicitly drawing them. Many artists do this, particularly for pin-up illustrations where accuracy matters much less with narrow FOV (since everything flattens out anyway).
- Accuracy: Low, but gets higher with intuition.
- Drawing speed: Fast.
Winging it sketch:
2. Hand drawn perspective guides. You can go through the tedium of setting up perspective guides by hand (like we had done above), which is a nice exercise used to build intuition, but not recommended if you need to get something done fast, unless you do the bare minimum needed to get a step above winging it.
- Accuracy: Medium to High, but still error prone.
- Drawing speed: Slow if you spend a lot of time drawing scaffolding and dividing up space; Fast if you do the bare minimum for drawing hints.
3. Perspective rulers provided by painting software. Measuring distances and dividing space is simplified by using grids. Drawing lines to and from vanishing points is quick. If you have these tools, you may as well use them. These rulers can be easily matched up to 3D scenes as well.
- Accuracy: High.
- Drawing speed: Fast; Complex shapes still end up being slow and tedious, which are trivial in 3D.
Perspective grid in SAI2:
4. 3D software. It will be more accurate than anything done by hand, as well as eliminating some unknowns such as where to place the extra vanishing points for 2 or 3-point perspective, complex rotations, complex models, complex poses, texture details, etc. The apparent magnitude problem is completely trivialized. You also can take advantage of more exotic perspective systems, such as curvilinear (fisheye), and cylindrical (panorama).
- Accuracy: High to exact, depending how it's used, either as a reference (when winging it) or directly.
- Drawing speed: Fast, but modelling can turn into a time sink.
Design Doll posing reference (can be a double edge sword; best to try sketching with intuition first, then consult with the pose doll if having trouble, otherwise it may kill the energy of a sketch. Here I did not follow my own advice):
Background assistance, Megumin bath scene:
Prop assistance, Shuten's wooden stakes:
Files