Home
Home

 Artists
 Search
 Recent
 Random
 Posts
Posts
 DMs
DMs
 Tags
Tags
 Random
 Importer
 Import
 FAQ
FAQ
 Account
 Register
 Favorites
 Login
Login

【How to】2 hour drawing making (Pixiv Fanbox)

Content
需要があるか疑問だったのですが
公開しているデータの補足としてメイキング記事の提案をいただいていたので
2hdも100枚超になったこともあり、2020年のまとめとして試しに書いてみました。
あくまでも2〜3時間程度の短時間で描く方法なのでご了承ください。
I was worried about publishing this, because I was wondering if it was in demand.
Since I received a proposal for a making article as a supplement to the published data
Since 2hd has exceeded 100 sheets, I tried to write it as a summary of 2020.
Please note that it is a method of drawing in a short time of about 2 to 3 hours.
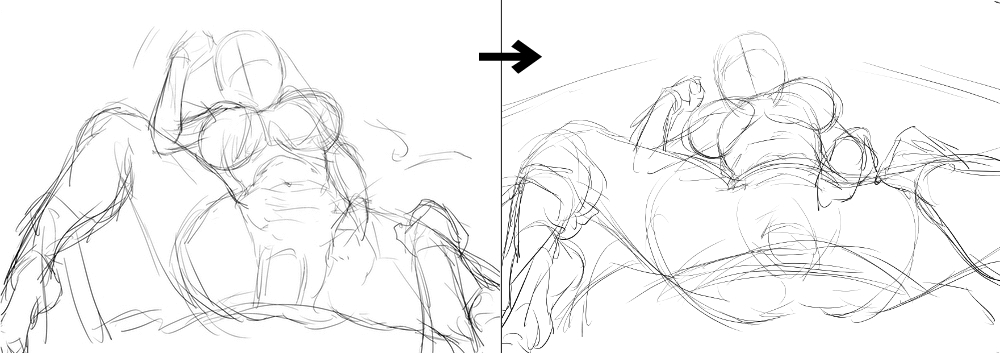
キャラやそのシチュエーションを考えながら、キャンバスに合わせて幾つか構図を描きます。
ザックリしたものを数枚、使わない構図も今後の案としてストックしておきます。
While thinking about the character and its situation, draw some compositions according to the screen.
I will save a few rough compositions and a composition that will not be used in the future.
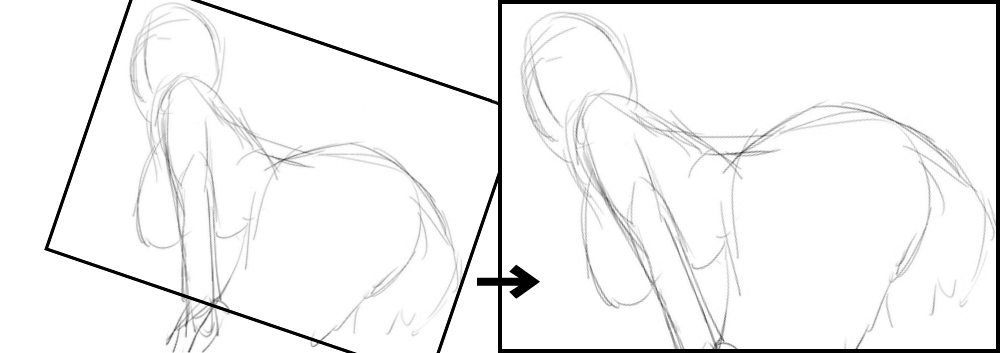
同じ構図でも、アオリを強調したり、キャンバスに合わせて拡大や回転させる…など
バランスや見せたい部分により修正します。
Even in the same pose, you can emphasize the tilt, enlarge it, or rotate it according to the canvas to find a better condition.
Please modify it according to the balance and the part you want to show.
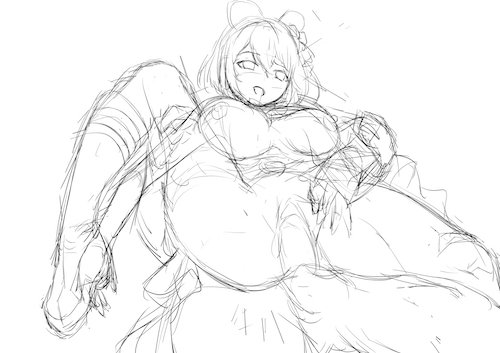
構図が決まったら、顔、髪型、服装など、細かい部分の下絵を描きます。
完全に決めるわけではなく、だいたいその位置にそのパーツがくる”想定”として置く感覚で気軽に消して描き直せるこころづもりで
Once you have decided on the composition, draw a rough sketch of the details such as the face, hairstyle, and clothes.
It's not completely decided, but it's a feeling that you can easily erase and redraw it as if you put it as an "assuming" that the part will come to that position.
見えない位置の腕や胴体なども簡単な線で示しておく事で、左右の手足の長さのバランスをあわせたり胴体が長すぎたりなどしないよう、完成した絵の整合性をとります。
Easily draw hidden and invisible parts.
In order not to lose the balance of hand length, torso, and overall.
下絵をもとにペン入れをします。
最近の作業配信時は、だいたいこの作業あたりから配信を始めています。
Draw the main line based on the sketch.
When I do a live stream of work, I start around this work.
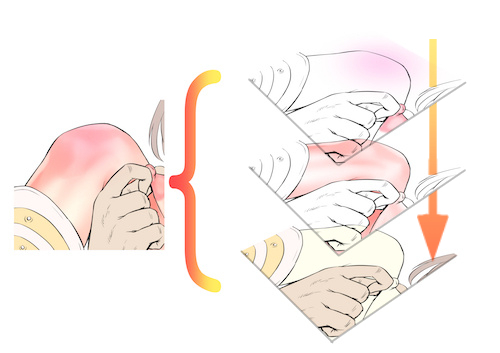
ペンを入れる順番として
”手前に来るパーツから順番に奥にかけて”を軽く意識して描きます。
Approximate drawing order of the main line.
From the front part to the back part.
Front: Green / Back: Pink
細かい部分などは下絵を修正しながらペンを入れていきます。
When drawing the main line, while revising the sketch.
下地となる色を置いていきます。
1枚のレイヤーで色を分けていきます。
基本はバケツで塗りつぶし、細かい箇所はペンで
あまり色数を分けず、近い色であれば同じ色で塗ります。
このレイヤーで肌の部分にはベース色となる明るい黄系の色を置きます。
Make one layer of basic colors.
Paint with a small number of colors, and make the approximate colors the same.
The basic color of the skin should be bright yellow.
ベースで塗った色ごとに”色域指定”で範囲指定し
その色ごとの新たなレイヤーを作って”透明ピクセルをロック”します。
”ぼかし”などを多用するため、色が混じっても支障が少ない様に
「同系色で1つのレイヤーにする」方向です。
"Specify color gamut" from the basic color layer Specify the color of each part,
Create a separate layer for each part of that color.
And "transparent protection"
Considering the possibility of color mixing due to heavy use of "blurring"
How to make one layer with only approximate colors.
肌以外は簡素にしています。
髪の毛や靴は適当にグラデーションをつけただけ、服の模様なども適当に描き込んでいます。
I do my best to apply the skin color.
I will not do my best in other parts.
The hair is only painted with gradation,moderate shoes etc.
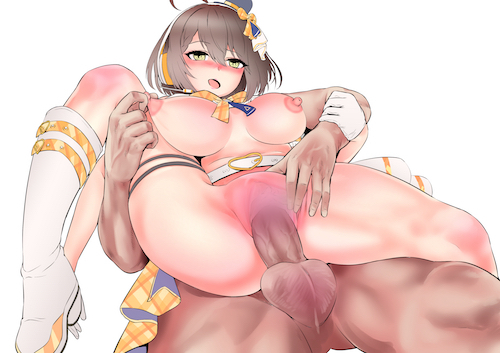
>肌色について About skin color
肌の色は、明るい黄系のベースになる色に
赤系で立体感や質感を描き込んだレイヤーを乗算し
さらに赤みをつけたいところには部分的に赤紫系の明るいピンク色を重ねて
明るさによって色相の変化を意識しています。
The skin color should be a bright yellow base color
Multiply the layer with the three-dimensional effect and texture drawn in red.
Where you want to add more redness, partially layer a bright pink color of reddish purple.
I am aware of changes in hue depending on the brightness.
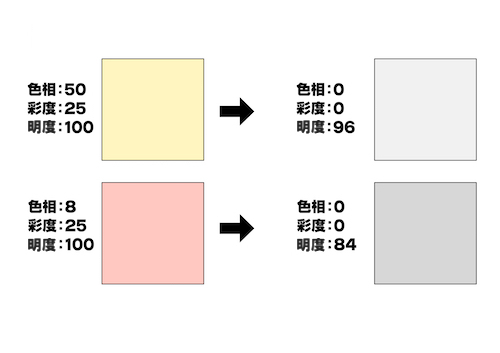
色の基本として Basic knowledge of color
赤と黄色では数値的には同じ明度でも、赤の方が暗くなる特性があります。
(カラーの状態からグレースケール化すると数値的にもわかりやすくなります)
Even if the brightness of red and yellow is the same numerically, red has the characteristic of being darker.
(Grayscale from the color state makes it easier to understand numerically)
これを踏まえて、
肌の色は、彩度と明度が同じでも色相によって視覚的に明暗を出すことができ
それによって濁らせない肌色を塗るように考えています。
つまり大雑把にいうと、明るい部分、中間の部分、暗い部分で
”明度”ではなく”色相”で塗り分けるよう意識しています。
Based on this
Even if the skin color has the same saturation and lightness, it can be visually brightened by the hue.
I'm thinking of applying a skin color that doesn't make it cloudy.
So roughly speaking, in the bright, middle and dark areas
I am conscious of painting by "hue" instead of "brightness".
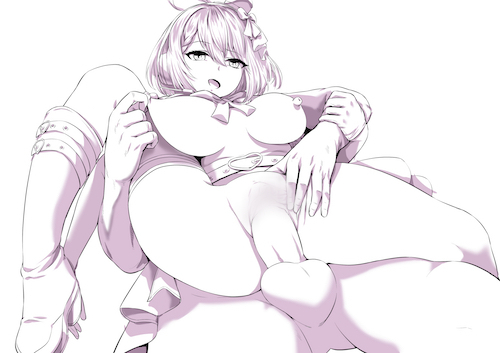
影となるレイヤーを作り塗っていきます。
影色は基本的には紫色系の薄いグレーっぽい色で
明度以外はあまり意識せず同じ色相の色で適当に塗っていきます。
(色相は後から部分に応じて範囲指定してから修正します)
髪の毛の調子もここで同時に作ります。
肌は別レイヤーの塗りで立体感を出しているので、ここでは肌には最小限の影のみ意識しています。
あまり暗くしすぎないように程度を見ながら塗っていきます。
Create and paint a layer that will be a shadow.
The shadow color is basically a light grayish purple color.
I don't pay much attention to anything other than brightness, and I paint with the same hue.
(The hue will be corrected later after specifying the range according to the part)
The tone of the hair is also made here at the same time.
Since the skin is painted in a separate layer to give it a three-dimensional effect, I am conscious of only the minimum shadows on the skin here.
Apply while checking the degree so as not to make it too dark.
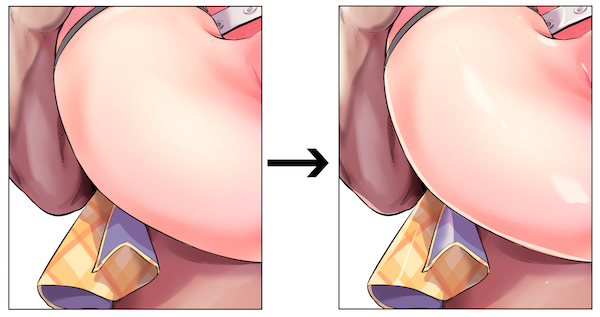
影のレイヤーを乗算で重ねることで、メリハリが生まれます。
By multiplying the shadow layers by multiplication, the picture becomes clear.
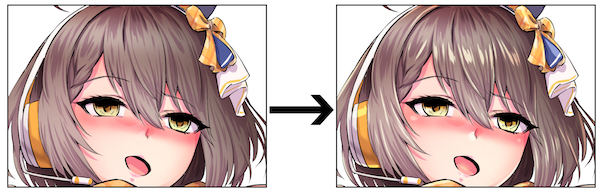
オーバーレイ合成のレイヤーを作り、回りこみの光や明るい部分を入れていきます。
ハイライトとはせず、黄色系のグレーを使い、
腕、足、胴体などのパーツの輪郭線の内側や、丸みのある部分の頂点付近に明るい部分を作ります。
Create a layer for overlay composition and add bright areas.
Not a highlight.
Make a bright part to be painted with yellowish gray.
Create bright areas inside the contours of parts such as the arms, legs, and torso, and near the vertices of the rounded areas.
髪の毛や頬や唇などのツヤもここで作ります。
Makes hair gloss at the same time.
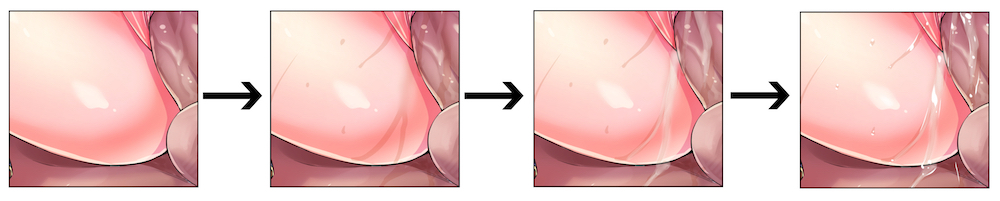
汗や体液など液体の表現を描き入れていきます。
clipstudioにはそういったブラシ素材もあるようなので、それらを活用するのもいいかとは思いますが、個人的には毎回塗っています。
基本的には「影」「白濁液」「ハイライト」の3枚のレイヤーで毎回描いていきます。
I will draw expressions of liquids such as sweat and body fluids.
It seems that clipstudio has such brush materials, so I think it would be good to utilize them, but I draw by myself.
Basically, I draw with three layers of "shadow", "white turbid liquid", and "highlight".
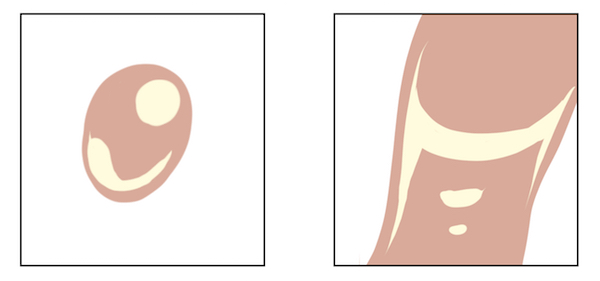
水滴のハイライトはこだわりを持って描く人も多いと思いますが
個人的には早く描くために非常に簡素に…
・小さい水滴の場合は右上に丸、左下にU型の曲線
・幅のある流れる液体はH型で橋を渡し、その下に点を2〜3
基本的にはこの2パターンで描きます。
I think that many people draw the highlights of water drops with particular attention, but
I value drawing fast.
・ For small water droplets, a circle on the upper right and a U-shaped curve on the lower left
・ The wide flowing liquid crosses a bridge in an H shape, and a few points are placed under it.
Basically, I draw with these two patterns.
簡素化するため、液体のハイライトと同時に目や肌のハイライトも入れます。
Draw the highlights of the eyes and skin with the same highlight layer.
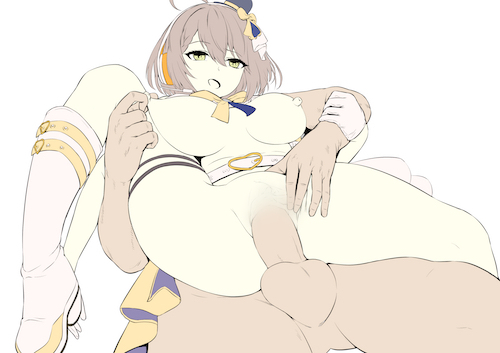
仕上げの段階として‥
・影色の部分調整
・線画を複製して”ぼかし”をかけて乗算
・簡単な背景
・部分的な描きたし…など行います。
As a finishing stage ...
・ Partial change of shadow color
・Duplicate the line art and multiply by "blurring"
・ Simple background
・ Draw the missing part
And so on.
・影色の部分調整 Partial change of shadow color
最初に作ったベース色のレイヤーから色域指定して、影レイヤーの部分的な色調整を行います。
肌の色は少し明るく彩度や明度を上げて、髪色の部分も違和感が無いよう色の調整を行います。
Specify the color gamut from the base color layer created first, and perform partial color adjustment of the shadow layer.
Make the skin color a little brighter, increase the saturation and brightness, and adjust the color so that the hair color does not feel strange.
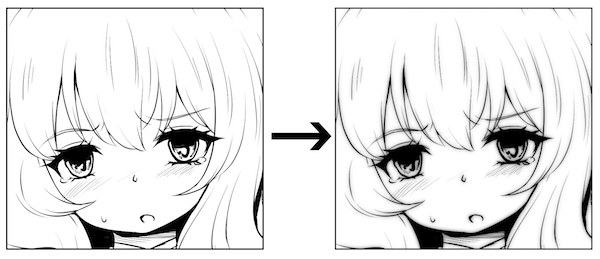
・線画をぼかす理由 Reasons to blur line art
かけだし同人サークルなどがたまに出す「ラクガキ本」などでもよく見る手法ですが
線画を”ぼかし”て元の線画に重ねると、なんとなく”雰囲気”が出ます。
これは、アナログ原稿作成などをする人がよく言う
「鉛筆での下書きは上手く見えるのにペン入れをしたらそうでもない」現象にも通ずるものだろうと思いますが
デジタルであっても同様に、ぼかした線を重ねると全体が柔らかい印象になり
「なんか良さげに見える」という現象があります。
This is a technique that you often see in "rough books" that are occasionally published by doujin circles.
If you "blurr" the line art and overlay it on the original line art, you will get an "atmosphere".
This is often said by people who create analog manuscripts, etc.
I think that it also leads to the phenomenon that "a draft with a pencil looks good, but it is not so if you put a pen in it".
Even if it is digital, if you overlap the blurred lines, the whole will look soft.
There is a phenomenon that "it looks good".
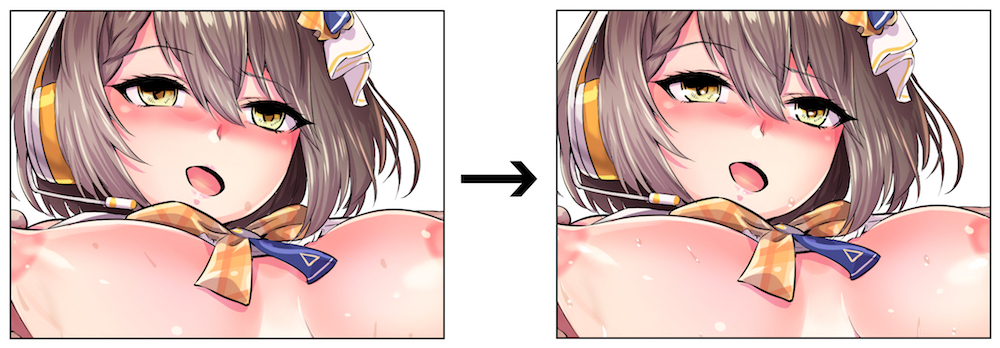
加算(発光)のレイヤーを重ね、画面が華やかになるよう適当に色を置いていきます。
単色刷りの漫画で、肌などのトーン処理にグラデーションを多用することで
画面がより良く見えるというセオリーがありますが、
同様の理屈と言えるかわかりませんが、カラーイラストの場合でも色のグラデーションを多用することでゴージャスな画面の雰囲気を作ることができます。
・画面に光の粒を散らす
・画面端から照明の光を入れる
・暗い部分に寒色系の色を、明るい部分に暖色系の色を差す
・照り返しを演出する
…など
Layer the add(Glow) layers and add colors to make the screen gorgeous.
In a single-color manga, by using a lot of gradation for tone processing such as skin
There is a theory that the screen looks better,
I don't know if it's the same reasoning, but even in the case of color illustrations, you can create a gorgeous screen atmosphere by using a lot of color gradation.
・ Scatter light particles on the screen
・ Enter the lighting light from the edge of the screen
・ Apply cool colors to dark areas and warm colors to bright areas.
・ Produce a reflection
…etc
ただ、あまりやりすぎないように、適度な軽さにしておく方が無難です。
Don't overdo it
短時間で描くイラストの場合
線画は面倒で時間がかかるので、下絵の状態から塗りだけで描き込んでいくという人も少なくないと思いますが、
長いストロークの線を一息で描けるようであれば、ペン入れの時間はかなり短縮できるので、個人的には「線画→塗り」の方が早く描けると感じます。
ここで挙げた幾つかの手法は、ある程度イラストを描く人にとっては、改めて聞くまでもないことかもしれませんが、絵を描かない人にも見識のひとつとして留めてもらえれば幸いです。
In my case, it is faster to draw the main line and paint it.
If you can draw long stroke lines accurately, this method will be effective for drawing quickly.
Some of the techniques listed here may not be necessary for those who draw illustrations to some extent, but I would like to leave them as an insight for those who do not.
Files