Home
Home

 Artists
 Search
 Recent
 Random
 Posts
Posts
 DMs
DMs
 Tags
Tags
 Random
 Importer
 Import
 FAQ
FAQ
 Account
 Register
 Favorites
 Login
Login

WIP Wednesday special edition (Patreon)
Content
I have a bit of a tradition to make a handmade Valentine's Day Card every year. In the past I've made some more complex cards with multiple layers, but tbh, I am slowly running out ideas. I hope I have some time and collect some of the pictures of the cards from the last years to show you.
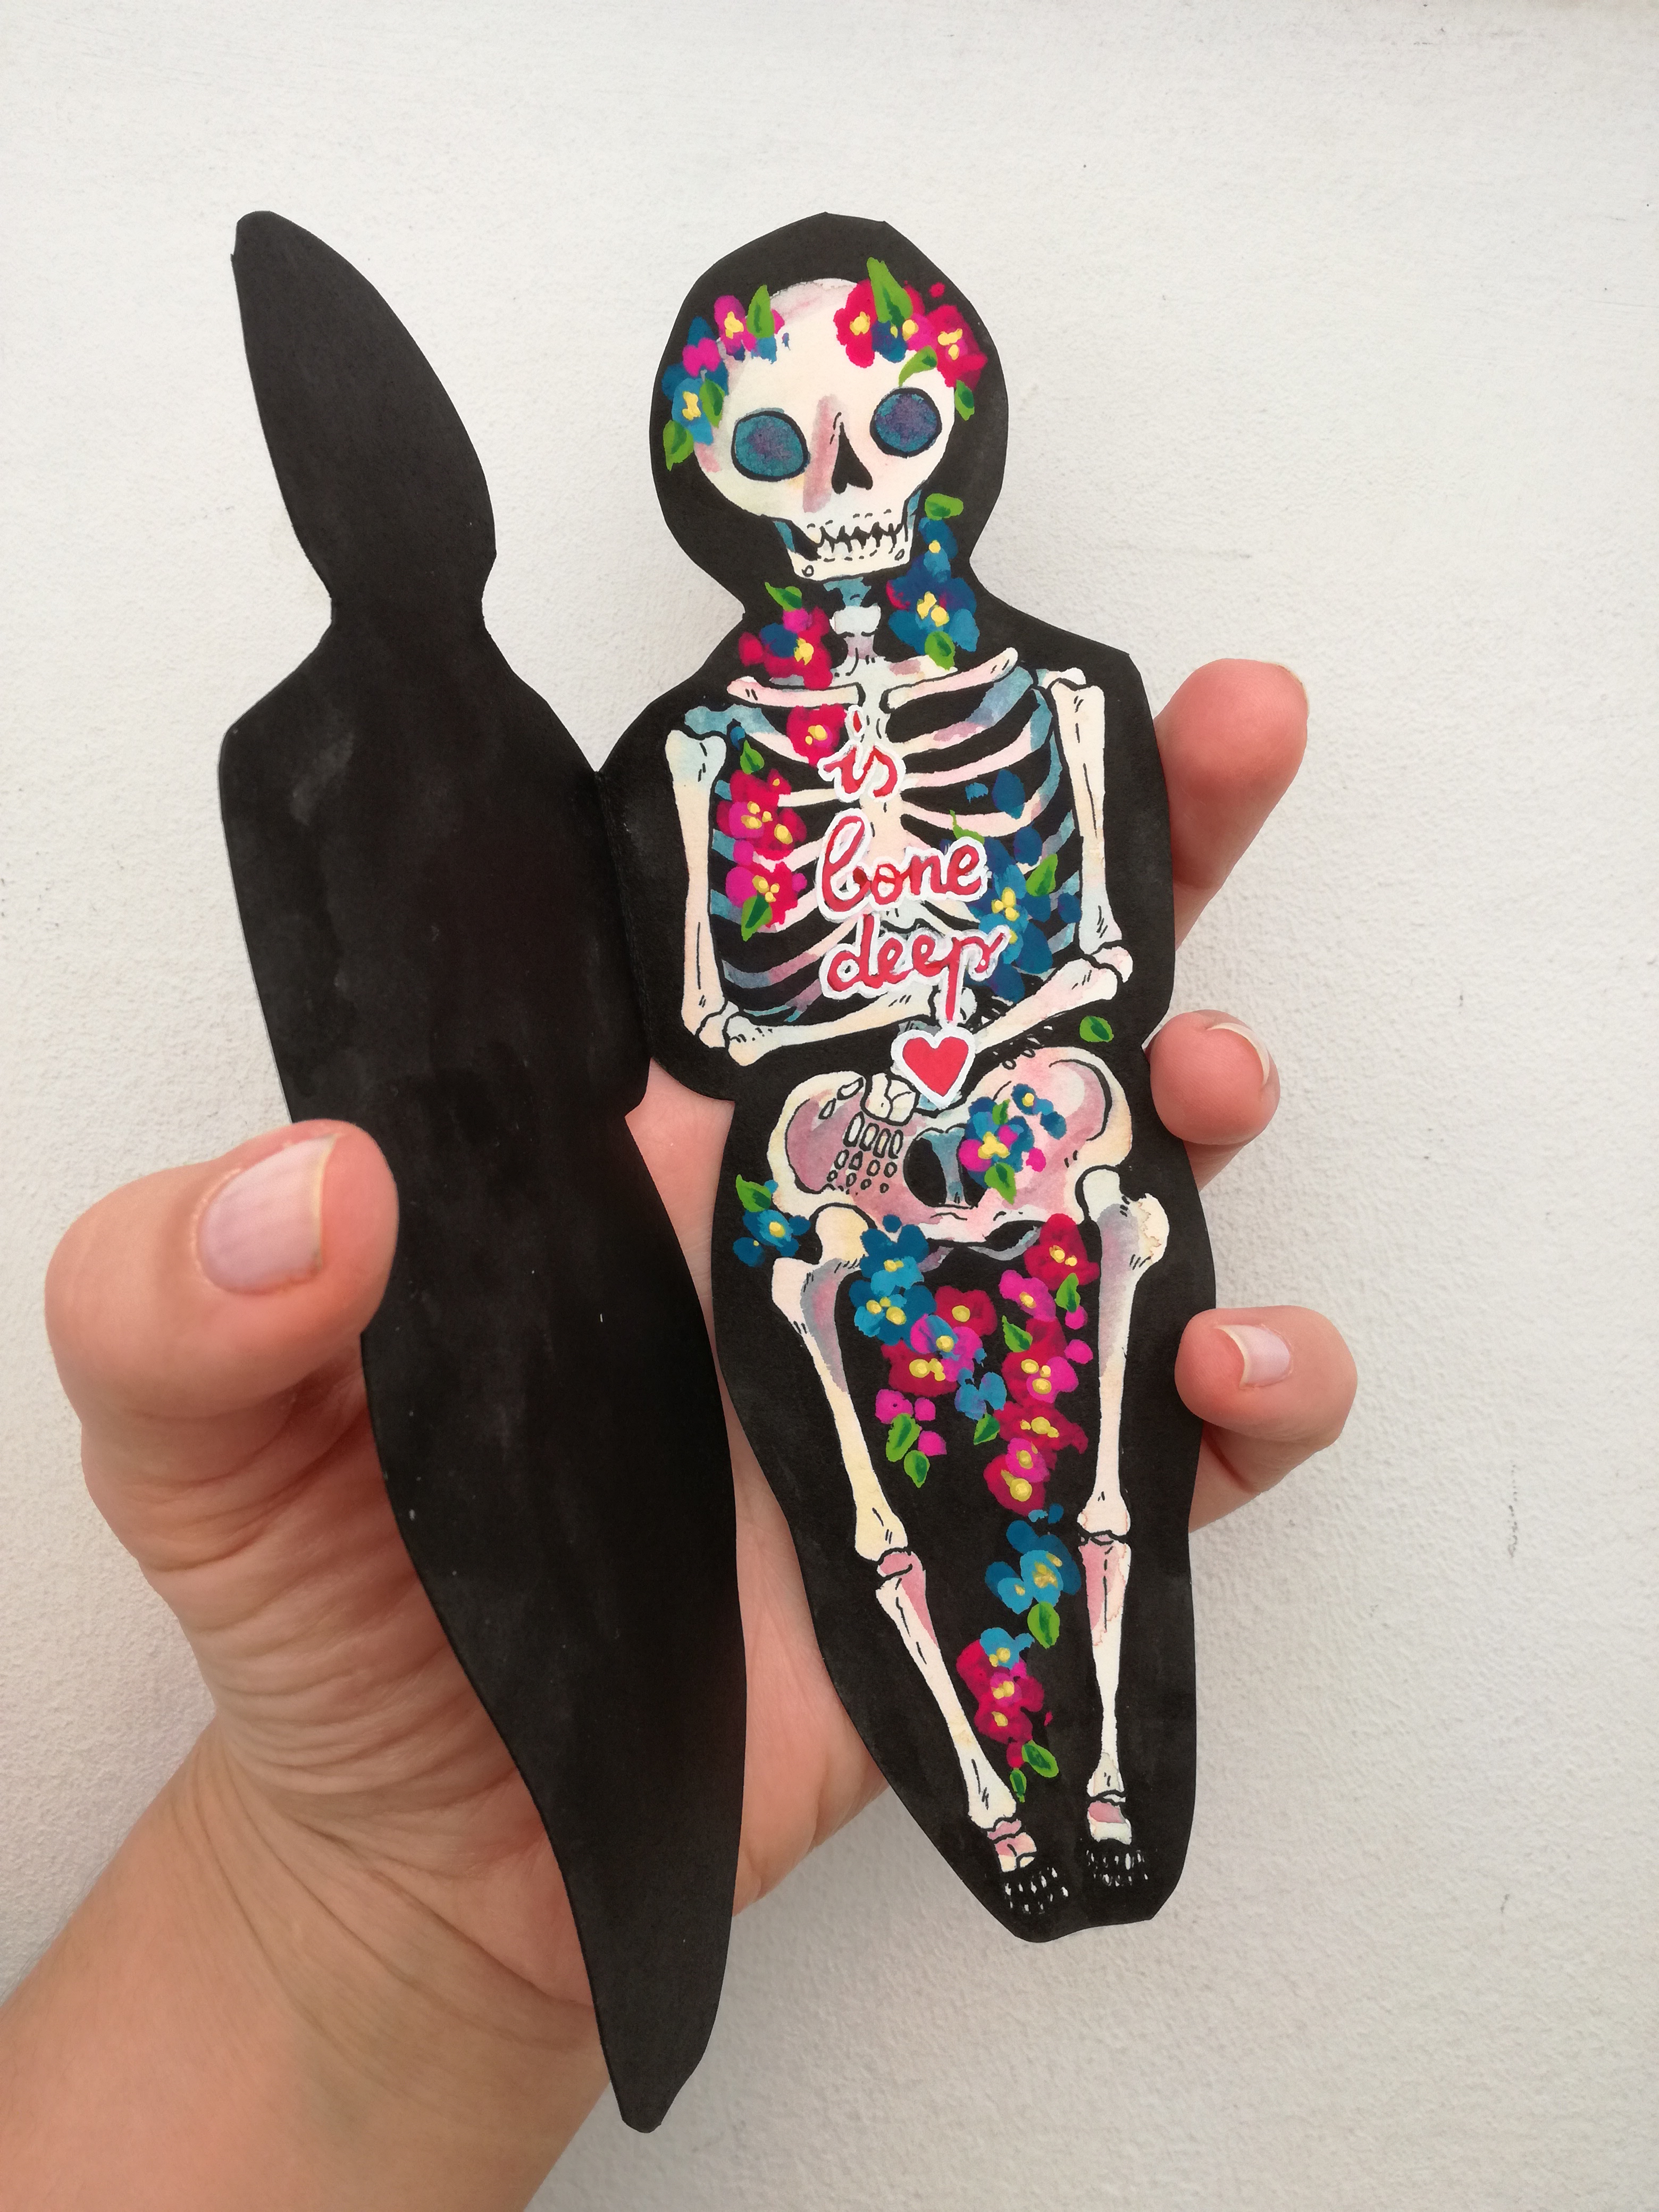
So this years card is a bit simpler. Initially I thought about making the skeleton as a separate layer but then it woul have been a bit bulky to open and close, so I decided to forgo the extra time of cutting out the bones just for it not to work in the end.
I have no idea if the text even works properly in english, I found a few cards with that text and it did make sense, so I hope it is not awfully wrong.
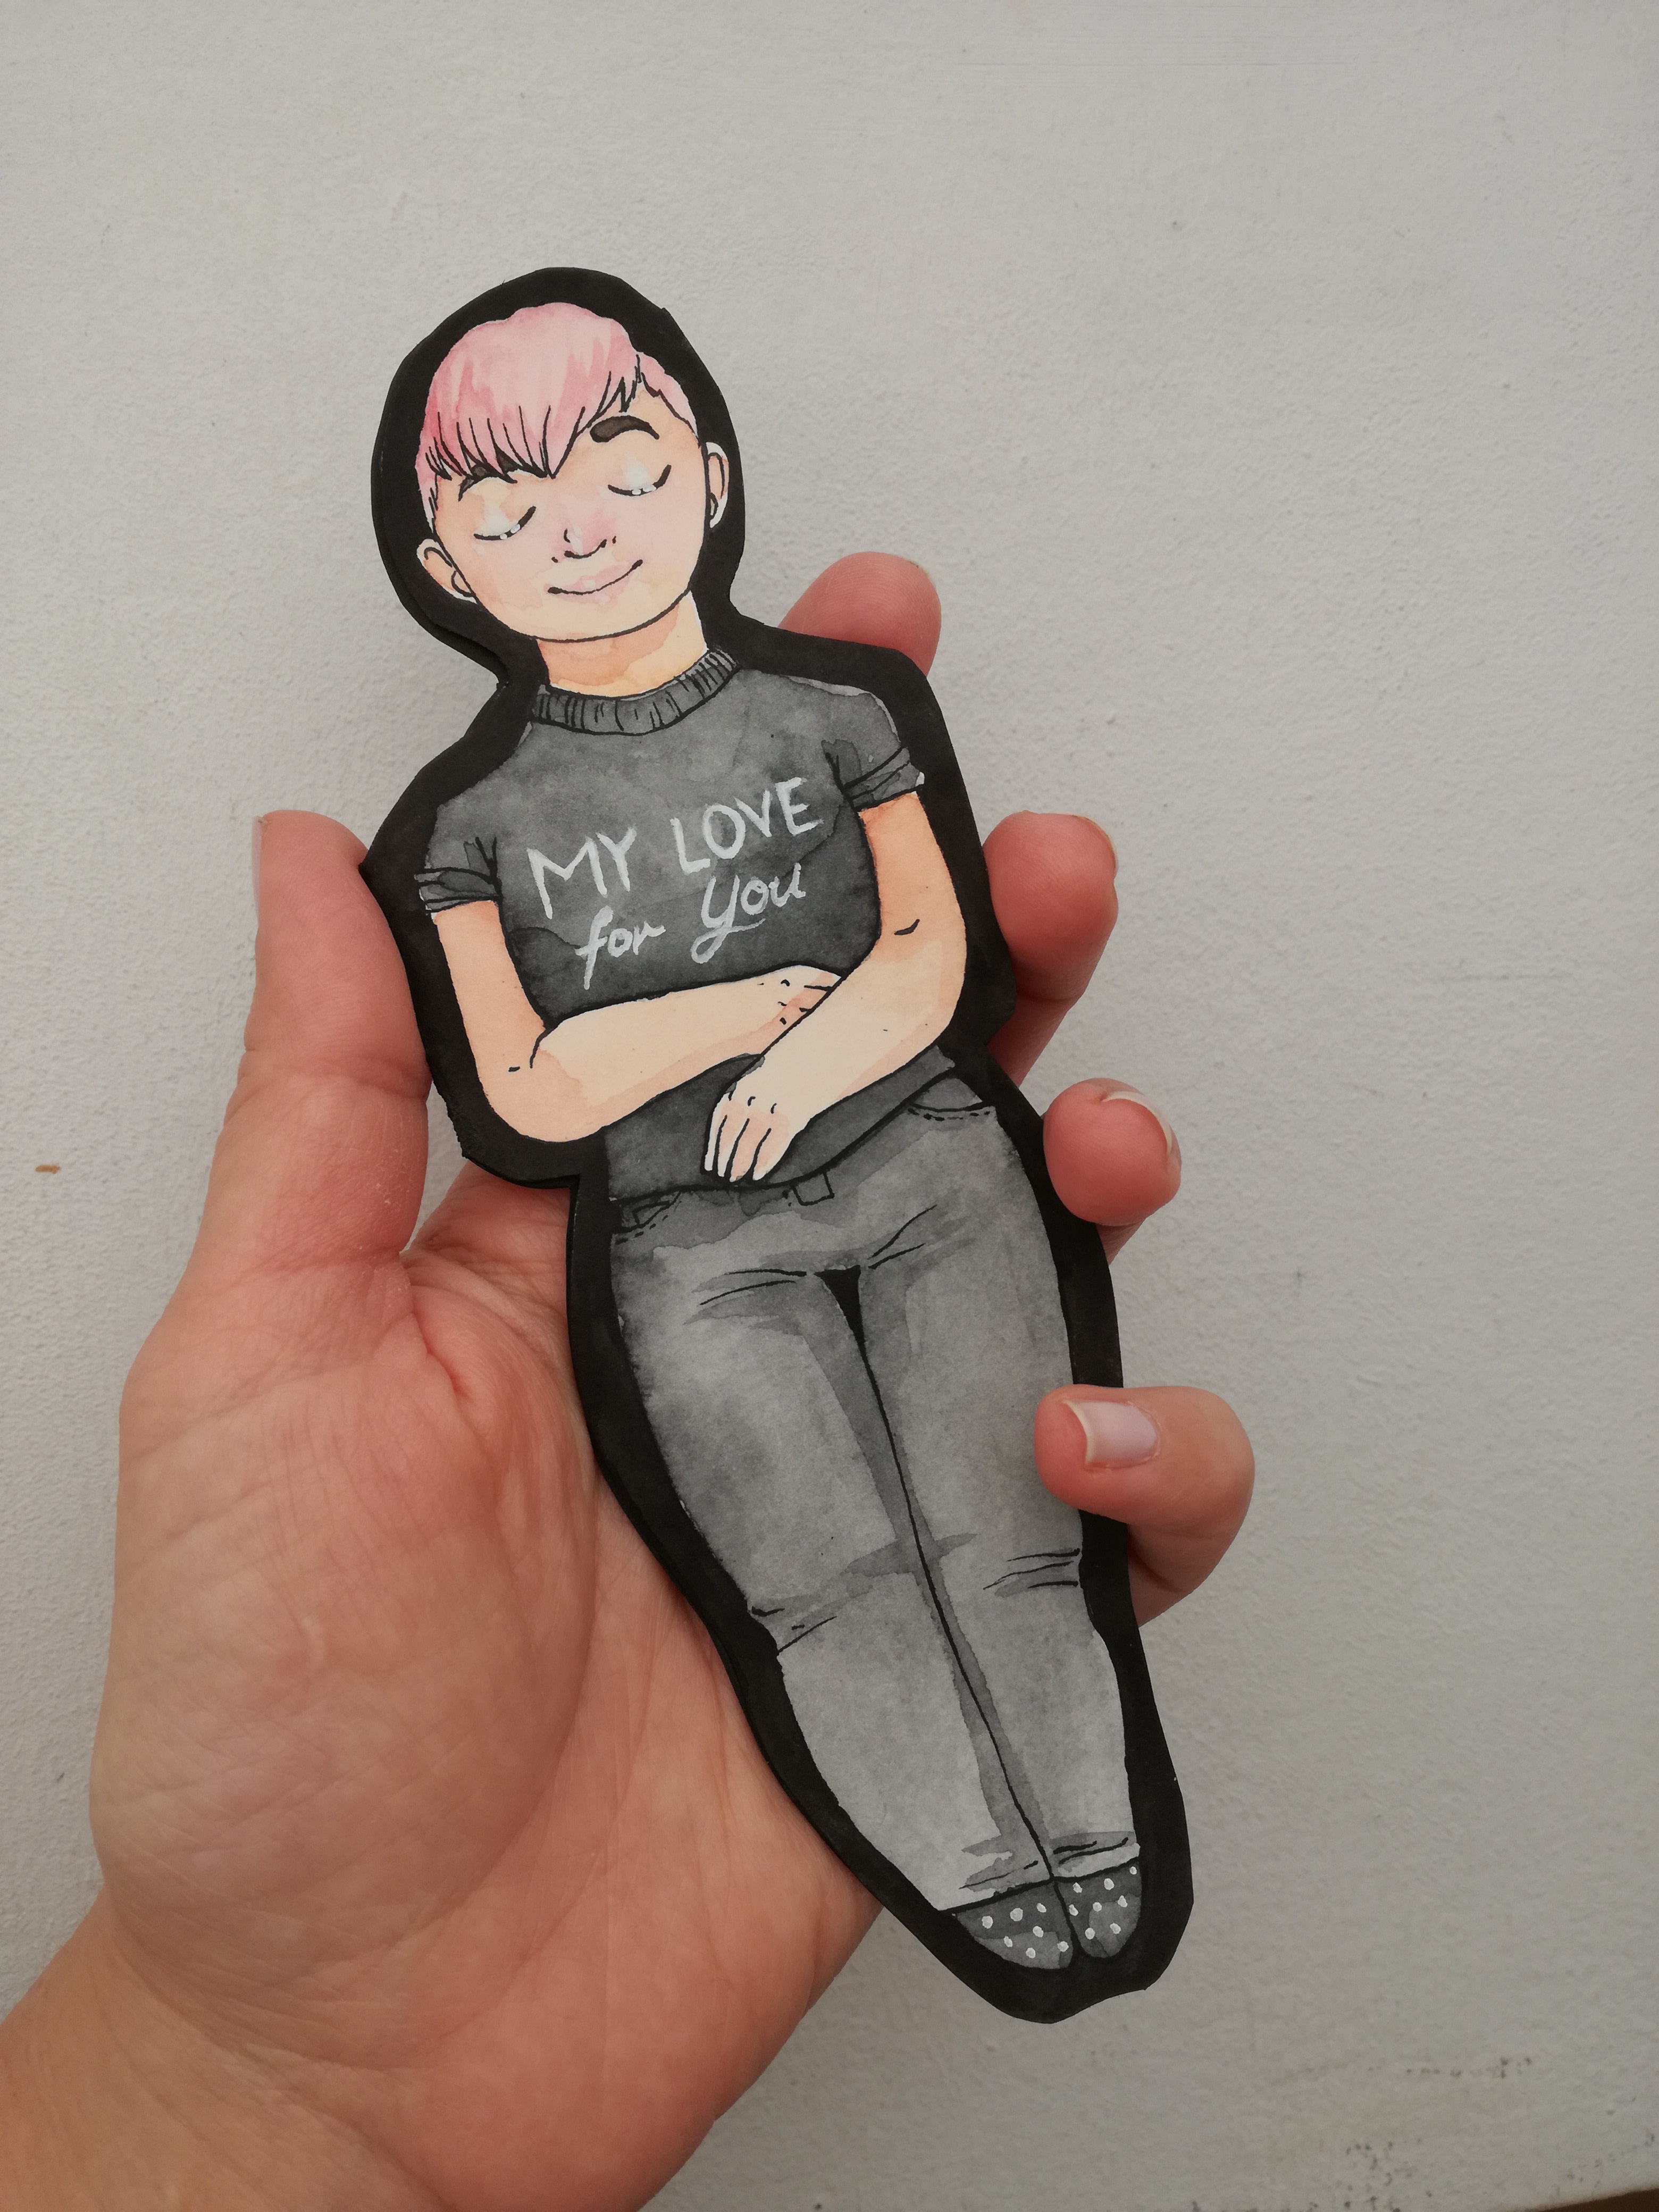
I think the hardest thing with this was to draw myself though. I decided to not draw the tattoo on my arm so in a year, when my hair is probably different again, it won't look like me anymore. But then, drawing some random person might not be very romantic? I just struggle a lot when it comes to drawing myself.
Here's a bit of the progress as well as my thinking process:
❣️ I started the card with a sketch on normal printer paper. I decided to do the front first because then i can align the skeleton in the inside and the skeleton alignment was not critical since I decided to let the drawing in the front float with a black frame around it. It would've been more complicated if I decided to cut out the person in the front without a frame because then the hinge at the left side, where the arm is, would've had to align perfectly with the skeleton in the back. So the frame was a style decision as much as it was a decision to make things easier for myself.
❣️ After I cut out the printer paper sketch I traced the outline and cut out the second half. I decided to not do the skeleton as a sketch because a) I was lazy and b) it actually was not needed and I tend to like sketches better than the finished original so I wanted to spare myself that disappointment.
❣️ I then taped the two sides together with Washi tape and made the hinge. This way is easier for me than doing it in one go on paper because the Washi tape hinge can be remade over and over until it fits. And it never fits the first time, believe me.
❣️ After I finished the printer paper dummy I copy it onto watercolor paper. For these cards I prefer to work with hot press paper with a smooth finish. Hot press watercolor paper has the bad side effect that it can be stressful to work with on bigger projects because color dries quickly on it and the typical watercolor washed are harder to emulate (at least for me) so it is perfect for these smaller project.
❣️ I then make a light sketch of the person and the skeleton. I try to keep it very light because erasing too much on watercolor paper destroys the surface and changes how it takes color, especially on hot pressed paper. If you erase a lot using a kneaded eraser is better because it does not have a lot of friction.
❣️ Next I do the outlines. I do them with ink and a nib pen. Sometimes I use a thin brush for that but since the card was already cut, a brush is very fickle to work with. When the sheet of paper is taped down or still attached to the pad a brush works well but controlling the lines of a brush is a lot about pressure, so to get thin lines I don't apply a lot of pressure. This way the cut out card can move while painting though which is annoying and leads to having to redo everything. Also, this is something you should not do at 4am like I did with this one because doing brush inking with tired hands leads to zig zag lines.
❣️ After letting the ink dry I erase the pencil sketch very, very carefully. I tend to let the lines dry longer than needed because smudging is my enemy and I've done it way too often just because I am in a hurry.
❣️ I don't have separate pics for the next steps because I honestly forgot and my hands were too dirty to pick up my phone. What I did is color everything in with watercolors. Usually it is two to three layers of color for the base color and then one to two layers for shadows.
❣️ After coloring (which takes longest because every layer has to dry completely) I folded the card. I made the mistake in not slightly precutting the edge so the fold is not clean. Sadly, there is no way to remedy that now. I went over it with a bone folder but I learned for next time.
❣️ Then I painted the frame and back black with ink. I did this in several steps because the wort thing to happen now would've been the card folding up with wet ink inside. Patience is key when doing these things! I also carefully painted the closed folded hinge from the outside so the broken paper does not seem so obvious.
❣️ Next I painted the gouache flowers. Since gouache is opaque and matte I decided to go with that over acrylics. I did write the text on the front and on the inside with a brush and gouache as well but sadly, it was not opaque enough so after everything dried I went over the text with some trusty POSCA markers. I can't recommend these enough, the white POSCA is a life saver and I love to use it in my sketchbook as well.
So this was a very long winded post. I hope you could still take something away from it. Please let me know if something is unclear.
Files